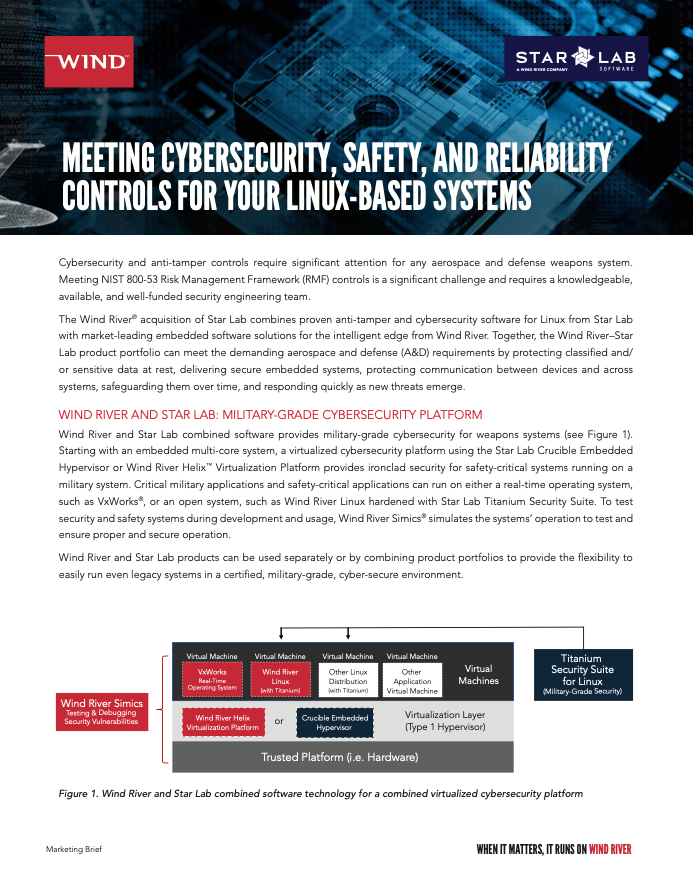
A Walkthrough of Gitlab Artifact Cleanup (with code)

Like many companies, we run our own private gitlab server, and while it’s highly configurable, it doesn’t always meet our needs out of the box. Sometimes we have to automate complex tasks outside of the normal workflow. As we discovered, the complexity of a tool such as gitlab would necessitate interaction with its backend API in order to automate some fairly complex tasks.
Recently, we started noticing that our artifact storage was getting quite large (approaching 5TB), and quickly. But it became clear that the effort to clean it up would not be simple and the built in tools were not sufficient. As we looked into it even more, we realized that numerous artifacts across projects didn’t have expiration dates set (somewhat intentionally); meaning they weren’t automatically cleaned up by gitlab, and for a variety of reasons we can’t cleanly use gitlab’s artifact expiration management. We also have a couple of unique requirements and workflows that make it difficult to just blindly cleanup the artifacts:
We believe in reproducible builds, and we have multiple fielded customer releases that are branches of core product. We have to be able to view these artifacts in the future and rebuild these pipelines.
We’ve had a lot of build system churn over the last couple of years that we’re slowly addressing, but it has resulted in different methods of defining artifacts and setting expiration dates.
Gitlab makes it difficult to have different artifact expirations for tags, branches and in our case, test / build pipelines as well. Realistically, we only care about keeping artifacts for tags, but we had essentially been keeping all the artifacts for master merges (among other things including temporary developer branches). We have some other things in flight to help alleviate the lack of artifact expiration, so we don’t end up in the same boat in 6 months.
We depend on multiple namespaces / projects, and in at least one of those we use most recent jobs for downstream artifacts.
We had nobody to own / oversee the storage requirements / artifact expiration and we had just accepted some slowness in our CI environment.
With these requirements in mind, we embarked on a journey that was clearly not going to be straightforward or simple. Using the default solutions in the gitlab documentation only got us so far, as we mostly couldn’t use the nuclear option and drop all non-expiring artifacts. At a minimum, we had to make sure we kept our customer specific branches. We also did a not so quick, artifact integrity check using the rake task [gitlab-rake gitlab:artifacts:check VERBOSE=1]. We did discover some integrity issues which seem to stem from when we migrated from local to object storage. Like many tools used in the developer environment, gitlab exposes multiple mechanisms to interact with it. We had the choice of using the RESTful API or using a rails console; gitlab’s documentation starts you down the path of using a rails console, but is definitely lacking in flexibility. At the end of the day, we actually ended up using both interfaces for various facets of the cleanup and management, with several developers using the REST API to clean up their own pipelines after we identified the correct builds and/or pipelines using the rails console. It was also not surprising that while a tool like gitlab exposes various APIs and lots of complexity, it’s not always clear how to automate various tasks or extend the interfaces for your specific environment or workload.
We spent a lot of time reading through the gitlab source and making use of the inspect method in a rails console to identify ways to filter our artifacts and purge as much as possible. We ended up making more than a dozen different purge runs, using multiple scripts and/or snippets. A quite cumbersome task was made much quicker by their use, and was definitely easier than having developers go into gitlab and manually delete thousands of artifacts and/or builds. Like many organizations, we try to enable our developers to focus more on the actual development and less so on mundane technical details that are loosely related to development activities, and as a result we get to automate a lot of rather mundane tasks where it makes sense.
These purge runs started with the very low hanging fruit (basically we don’t need anything before a certain date), we know we can drop anything for a few select branches / tags / refs (there was a lot of filtering and processing to get there), and then the slightly more nuclear approach presented below. We still have some work to do, but we were able to reduce our total artifacts from almost 5TB to less than 1TB. Though the cleanup isn’t complete, a huge chunk of it is behind us, and we now have the ability to automate it regularly once we finish some inflight development tasks.
As part of our purge, and with some of the back-end / build-system changes still in flight, we ended up making several additional scripts to either do the purging (based on specific projects / pipeline ids) or perform additional analysis / extraction of various artifact details. Taking the time to write these scripts was honestly pretty critical to getting the job done in any sort of reasonable time period, while not creating additional burden for our developers. The idea of culling through the artifacts manually is a nightmare no one wants to live through. Obviously not a great use of time. We’re including our analysis and purge scripts below (as well as in our github repo), so they can hopefully be a great help to others who need to analyze and/or clean up their gitlab artifacts. Many of the methods we use and the data we’re extracting about builds isn’t fully documented unless you dig into the gitlab source (and this holds for many other similarly complex software packages, that don’t always fully document their external APIs). In theory, these same general approaches could be used with the gitlab REST API, and you wouldn’t need to use a rails console.
As we were filtering artifacts for the great purge, a question arose. Does gitlab’s erasable? method consider most recent builds for a pipeline? This led us further into the gitlab source, starting here [https://github.com/gitlabhq/gitlabhq/blob/6078f74ce914ab0ec4a4a6a21318a64b864ba625/spec/models/ci/build_spec.rb#L1801] and leading us to here [https://github.com/gitlabhq/gitlabhq/blob/9c8e8b5ffc6e11d827fa42f2dce5f90c4dc19493/app/models/ci/build.rb#L839]. We’ll probably look at extending erasable? Or using it as a partial filter to look up and verify that a job is not the most recent to help us in purging some other artifacts we have (or if you keep reading, you’ll realize that we already used it to find the most recent pipeline).
We don’t have much error handling in the current script we were using for the purge, but we ended up having to add some, thanks to some real gems (ha! See what I did there?). Turns out we have at least one build with downloadable artifacts, but without an artifact size set and ruby refuses to coerce a nil value to 0 such that can be added to the size of total purgeable artifacts. At some point we’ll want to investigate that bit of data integrity and try to root cause it (or at the very least, understand why it happens). You’ll also see we hit similar conditions with deleted users, and we do a lot of “magic” to identify and/or set a responsible user or the system for removing artifacts.
The resulting purge script, enumerated over our 5 projects with the largest artifact storage. This was determined using some additional filtering, as well as the snippet in gitlab’s docs here [https://docs.gitlab.com/ee/administration/job_artifacts.html#list-projects-by-total-size-of-job-artifacts-stored]. As a bonus, we took our purge script a step further (in the second version below), to let you go a bit more nuclear, and enumerate over all the largest projects and drop artifacts.
While we enumerated over the 5 projects we’re interested in (defined in the array on line 11 and being it’s an array you can add / remove additional projects / namespaces as required foryour environment), we selected artifacts that are older than 6 weeks. We decided on 6 weeks as a relatively safe floor to use for comparisons and artifact parsing, in part because it was before our most recent release. We also only look at builds with downloadable artifacts, that are erasable (loosely translated, not currently running), and are not part of a tag.
While we were doing our filtering, we spent a lot of time modifying / changing line 32. One of the iterations we used was to explicitly check for a specific reference (i.e. merges into master), using: build.ref.eql?("master"). You can also use ruby’s various regular expression filters here (e.g. (build.ref =~ /rc\d+/), as we did to help narrow your search. Line 32 basically helps you be a little more targeted and not so nuclear. We ended up having 6-8 (dependent on the run) filters of various sorts on line 32 for our environment.
Some other tidbits that might be useful:
Determining which user started a build / pipeline:
build_user = User.find_by(id: build.user_id)
puts “#{build_user.username}”
Note: You might want some error handling here as if the user was deleted, this will return nil and you won’t be able to get the username from it. As part of your error checking you can do something like `if build_user && !build.user.blocked?` if you block users instead of deleting them.
Get the ID for the build’s pipeline:
build.pipeline.id
Does the reference for that pipeline still exist (i.e., was it a branch that was deleted?)
build.pipeline.ref_exists?
Is this the latest pipeline for a ref?
build.pipeline.latest?
Our initial purge script may not work for your environment, but it might help steer you in the right direction. It adds the ability to do a dry run (without the purge), provides some logging / output that can be used for filtering, iterates over multiple projects / namespaces at once, and tracks total purgeable / purged artifact size. For the most part, we also added the ability to create CSVs, just to enable easy analysis (as well as our own shell magic).Note that while it’s mostly a CSV, we added some additional lines for easy parsing that aren’t strictly in a CSV format.
A couple of configuration / tailoring notes if you do want to try and use the script as is, but seriously test it in a sandbox environment first, or what do I care - be brave and just run it! On line 5, we set the user responsible for artifact deletions. This can either be an actual username in your environment, or it can be set to nil. Setting it to nil will show in the gitlab interface as a system deletion (i.e., automatic artifact expiration and removal), otherwise it will show as the artifacts were deleted by the specific user. Line 7 establishes whether this a dry run (and it defaults to be a dry run with no actual deletion, so you don’t go full nuclear on your first attempt), line 8 (verbose) lets you enable logging primarily as a CSV to stdout, and you’ll want to modify the array on line 11 with your list of projects and namespaces. Finally, if you want to use something other than 6 weeks, you’ll need to change 28 (gitlab’s documentation provides some other suggestions, but day, week, month, year seem to work as well). We already talked about line 32, but you may want to establish additional or different filters for your environment.
You’ll need to run this using a rails console on your gitlab instance, and if you have verbose enabled, you’ll probably want to redirect the output. Gitlab’s docs are pretty clear about how to use a rails console, but depending on your environment and how you installed gitlab, you may be able to do something like this:
cat gitlab_artifact_purge.rb | ./bin/rails console > purge.log
And now for the scripts! We’ve linked them from here to keep this blog easily readable. First up is the basic version of the script:
Then we can combine multiple pieces and change up our project iteration, making it a bit more nuclear to just go after the largest projects in our environment.
Version 2 – Slightly more nuclear, but what is possible with the cleanup tasks
A simplified purge script using a static list of pipelines to erase artifacts for
So, what’s the moral of the story? Cleanup efforts like ours can be cumbersome and challenging. Taking the time to automate the process (or at least parts of it) made it much more likely to get done. Otherwise, it’s likely bound to sit on the backburner while everyone waits for someone else to volunteer. While we didn’t go the extra mile with our efforts (I.e. fully document the process, submit upstream changes, etc), that would be another area where contributions to the open-source community could be made. It’s not uncommon for APIs and various internals of commonly used, complex software packages to be poorly documented. Similarly, the need to go back and clean up things like artifact storage can be mitigated by establishing proper expiration rules, and creating visible dashboards that reflect the state of your environment. By publishing the scripts we used to clean up our server, hopefully the next team will save even more time.


To delve into security concepts, check out our free whitepapers below: